|
TABLE OF CONTENTS

JD Introduction and Setup
1. Getting Started with JD 2. Using The Robot Program 3. Introduction to Robotics 4. JD Box Contents 5. Battery Care & Charging 6. Building JD Humanoid 7. Connecting to JD over WiFi 8. Using a USB Wi-Fi Dongle 9. Fine Tune JDs Servos 10. Care for JD 3D Printing for JD 1. 3D Print Files for JD Mobile App for JD 1. Using JD with Mobile App General CoursesSoftware 1. ARC for Windows PC 2. Example Projects 3. Controls 4. Getting Help with Controls 5. ControlCommand() 6. Virtual Desktops 7. RoboScratch 8. Blockly 9. EZ-Script Mobile Software 1. Create a Mobile App Linear Programming 1. Create a Scene Using RoboScratch (Big Hero Six) 2. Create a Scene using Blockly (Avengers) Logical Programming 1. Programming Concepts (Variables, If/Else, Logic) 2. Counting Up 3. Counting Down Camera Input 1. Introduction to the EZ-B Camera 2. Face Detection with RoboScratch 3. Face Detection with Blockly 4. Face Detection with EZ-Script 5. Color Tracking with Servos 6. Color Tracking with Movement 7. Detecting Multiple Colors 8. Line Following with Roli, AdventureBot and Shell-E 9. Vision - Object Training & Recognition 10. Glyphs to Control Robot Movement 11. Detecting Glyphs & Augmented Reality 12. QR Code Detect 13. Microsoft Cognitive Emotion 14. Microsoft Cognitive Vision Audio Input 1. Speech Recognition RGB Output 1. RGB Animations Positioning 1. Servo Control 2. Introduction to Servo Motors 3. Create a Robot Dance 4. Program Robot to Dab 5. Program Robot to Play Piano 6. MYO Gesture Armband Navigation and Movement 1. Movement Panels 2. Navigating using RoboScratch 3. Navigating using Blockly Creative Applications 1. Customize Your EZ-Robot 2. Control Robot From Twitter 3. Nest Thermostat EZ-B v4 Robot Brain 1. EZ-B v4 Robot Brain Overview 2. DIY Autonomous Robot Vehicle 3. EZ-B v4 and IoTiny Wi-Fi Modes 4. Change WiFi Name 5. Resetting Your EZ-B v4 or IoTiny 6. USB WiFi or Ethernet Adapter Robot Troubleshooting 1. Which Robot are You Using? |
Fine Tune JDs ServosIntroduction
In this lesson, we will demonstrate how to create a servo profile for your JD from a PC using EZ-Builder. The Servo Profile creates offsets for each servo to compensate for physical limitations of motors and gearing alignments. We will use the Servo Fine Tune utility to create a profile that matches your JD's configuration. The only time you will need to repeat this process is if you disassemble JD or relocate the servos to different places on the robot's body. Before You Begin *Important: If a servo requires more than 10 degrees of fine tune, this means the servo must be manually re-aligned. View the JD troubleshooting section and locate the Servo Calibration section by clicking HERE. Servo Fine Tune Video In the video below, we will demonstrate a few steps by calibrating JD's arm servos. The video does not cover the entire calibration process, as the process should quite clear by the exercise. What You Will Need
Step 1 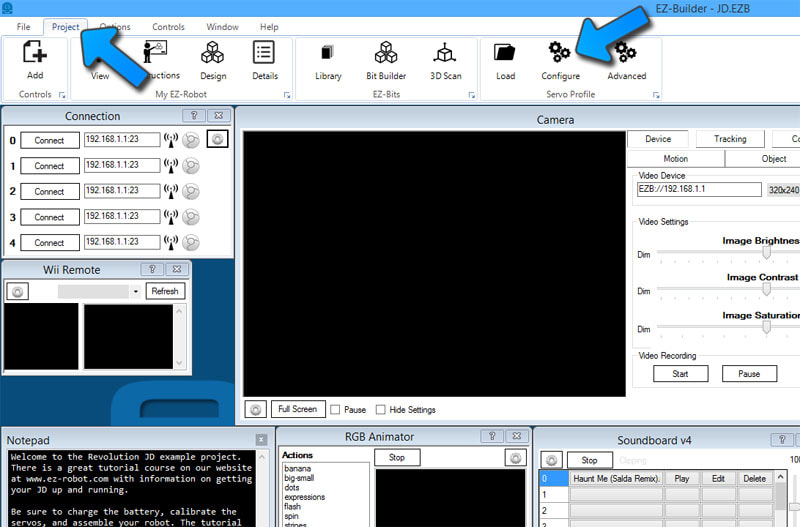
Connect EZ-Builder to your JD. Press PROJECT from the top menu. Now press CONFIGURE under the Servo Profile section.
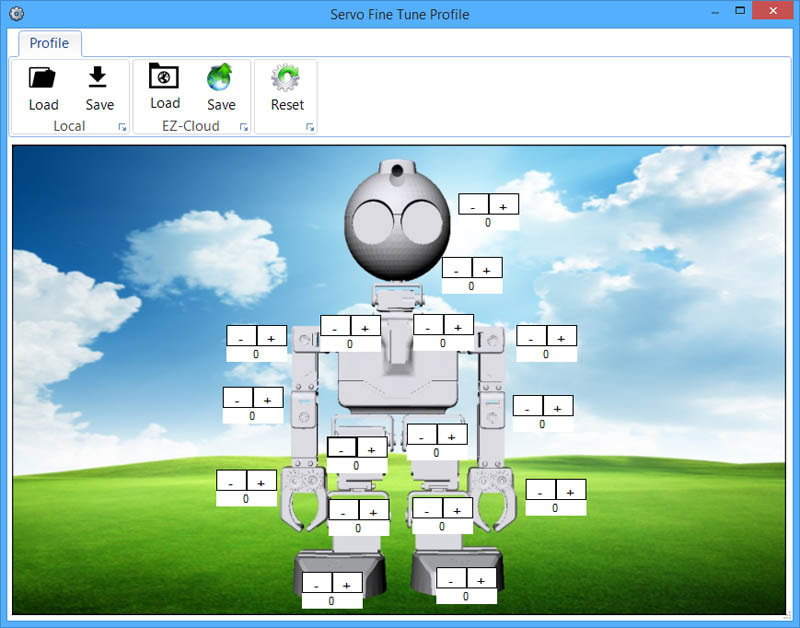
The Fine Tune Servo Profile utility will be displayed. Here you have a model of your robot and buttons located around the joints. These buttons have - and +, which allows you to SUBTRACT or ADD positions to move the servos into alignment. In the next steps, you will press the - and + buttons on each joint to align the servos. Once you have completed the alignment, you will be instructed to save this servo profile so you never have to do this process again (unless you disassemble and reassemble JD).
*Note: If you disassemble and reassemble JD, you will be using servos in different places on the robot. By doing so, you will have to redo his step. Step 2 
When JD is first connected, he will move into the calibration mode. Stand up JD on a flat surface.
Step 3 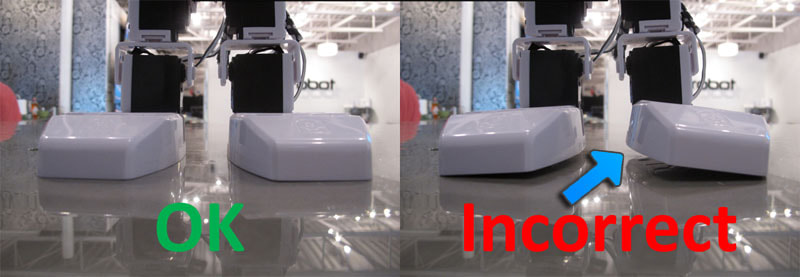
Press the + and - buttons on JD's ankle servos to adjust the ankles until the feet are parallel/flat with the surface.
Step 4 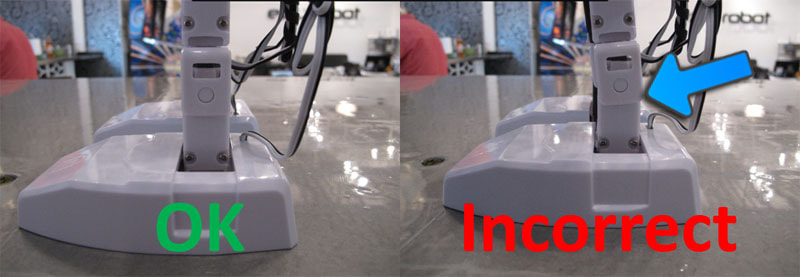
Now use the + and - buttons to align the knee lever to be parallel with the servo housing. This is the 90 degree position, similar to the process when calibrating the servos manually. However, this time you are fine tuning the servos to be more precise.
Step 5 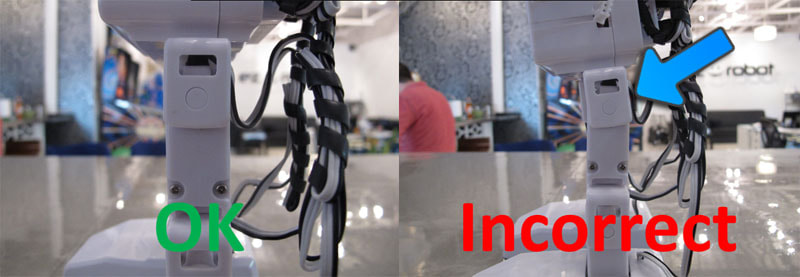
Use the + and - buttons to align the Upper Leg servo to be parallel with the servo housing. This is the 90 degree position, similar to the process when calibrating the servos manually.
Step 6 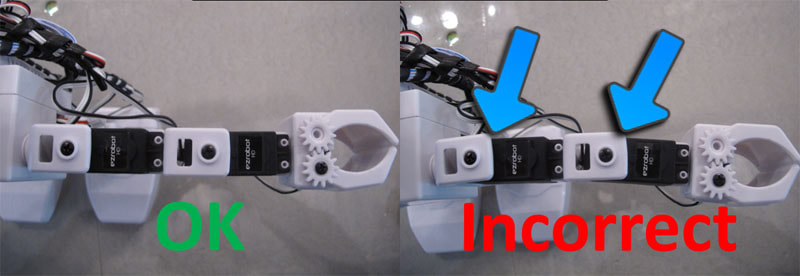
Use the + and - buttons to align the arm elbow lever servos to be parallel with their servo housing. This is the 90 degree position.
Step 7 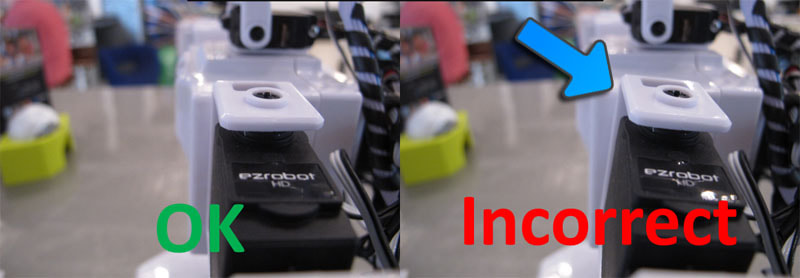
Use the + and - buttons to rotate and align the shoulder lever servos to be parallel with JD's Body. This is the 90 degree position.
Step 8 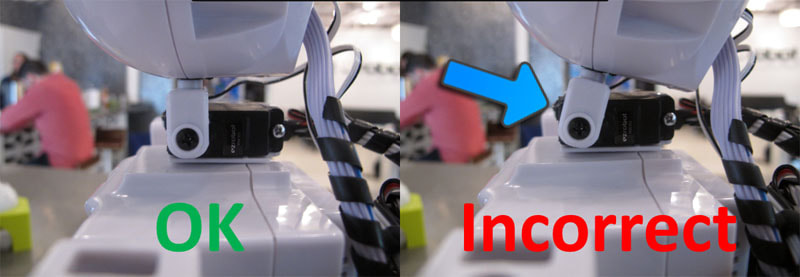
Use the + and - buttons to align the vertical neck servo to be 90 degree upright from JD's Body. This is the 90 degree position.
Step 9 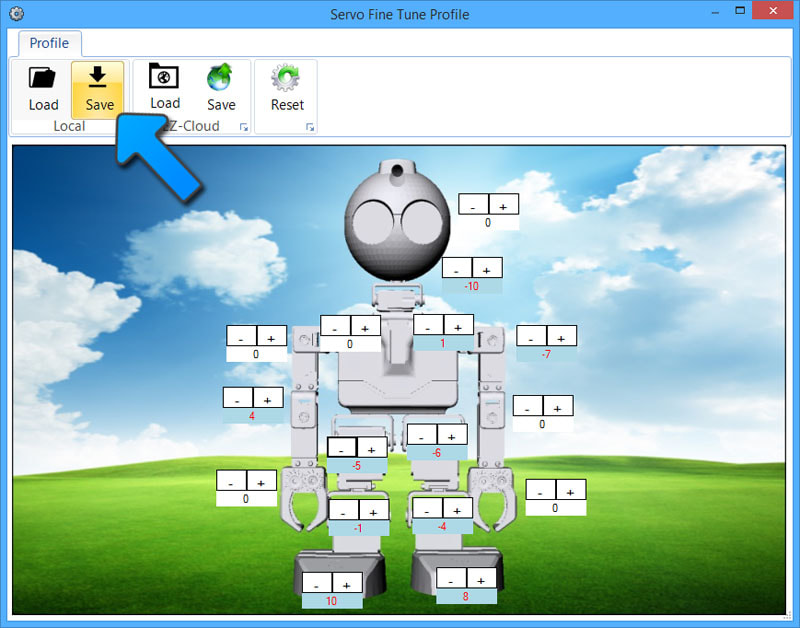
We will now save the Servo Profile that you have created for JD. Press the SAVE button and the Save File dialog will appear. Enter a descriptive file name for this Servo Profile. (such as "JD Alignment")
*Note: Now that you have created and saved a Servo Profile for JD, you will be asked to select the profile every time you load any JD project. The only time you would need to create a new Servo Profile is if you disassemble JD. Complete Advance to the next lesson - you are almost ready to have JD doing awesome stuff! |