|
TABLE OF CONTENTS
Software 1. ARC for Windows PC 2. Example Projects 3. Controls 4. Getting Help with Controls 5. ControlCommand() 6. Virtual Desktops 7. RoboScratch 8. Blockly 9. EZ-Script Mobile Software 1. Create a Mobile App Linear Programming 1. Create a Scene Using RoboScratch (Big Hero Six) 2. Create a Scene using Blockly (Avengers) Logical Programming 1. Programming Concepts (Variables, If/Else, Logic) 2. Counting Up 3. Counting Down Camera Input 1. Introduction to the EZ-B Camera 2. Face Detection with RoboScratch 3. Face Detection with Blockly 4. Face Detection with EZ-Script 5. Color Tracking with Servos 6. Color Tracking with Movement 7. Detecting Multiple Colors 8. Line Following with Roli, AdventureBot and Shell-E 9. Vision - Object Training & Recognition 10. Glyphs to Control Robot Movement 11. Detecting Glyphs & Augmented Reality 12. QR Code Detect 13. Microsoft Cognitive Emotion 14. Microsoft Cognitive Vision Audio Input 1. Speech Recognition RGB Output 1. RGB Animations Positioning 1. Servo Control 2. Introduction to Servo Motors 3. Create a Robot Dance 4. Program Robot to Dab 5. Program Robot to Play Piano 6. MYO Gesture Armband Navigation and Movement 1. Movement Panels 2. Navigating using RoboScratch 3. Navigating using Blockly Creative Applications 1. Customize Your EZ-Robot 2. Control Robot From Twitter 3. Nest Thermostat EZ-B v4 Robot Brain 1. EZ-B v4 Robot Brain Overview 2. DIY Autonomous Robot Vehicle 3. EZ-B v4 and IoTiny Wi-Fi Modes 4. Change WiFi Name 5. Resetting Your EZ-B v4 or IoTiny 6. USB WiFi or Ethernet Adapter Robot Troubleshooting 1. Which Robot are You Using? |
Detecting Multiple ColorsOne of the features that makes EZ-Robot so special is that the camera that can detect faces, objects, glyphs, QR codes and multiple colors.
For this tutorial, we will use the JD Humanoid, however, this process can easily be applied to any EZ-Robot configuration. What You Will Need
Instructions EZ-Robots can be easily programmed to recognize multiple colors at the same time, and then you can use variables to have your robot respond differently to different colors. Step 8 Within the Camera Control, click on the Settings/Configuration button. In ARC this is the Three Dots in the top right corner of the window. In EZ-Builder, it's the Gear button in the bottom left corner. Within the Config Dialog window, click on the "Scripts and Variables" Tab, and then click on the "Start Tracking" Script box. *Note: Your robot will perform the script you define in this box each time the robot starts Tracking a color or object. This Script field does not define when a robot will start tracking.. Within the Scripting Interface you can choose to program in Blockly, Python JavaScript and EZ-Script. This example will be shown in EZ-Script, so click that Tab. Type: SayEZB("I see " + Note the empty space before the closing quotation mark above. This will help your robot to leave a gap between the word "see" and the name of the color Then Click on the Variables Tab in the upper right portion of the screen. Locate and click the variable ($CameraObjectColor). The variable will be added to your script. Be sure to add a closing parenthesis to complete the command. Once completed, your script should look like this: SayEZB("I see " + $CameraObjectColor) When the robot speaks the above command, it will swap in the variable of the color the robot sees, to complete the phrase accurately. Hit the SAVE button, and give it a Try! Place the objects in front of the camera and the robot will tell you the color it sees. Now that your robot can recognize different colors, try adding Actions like a Wave or Bow to your robot when it recognizes a color... and then add IF/ELSE statements to get the robot to respond differently to different colors. Step 1 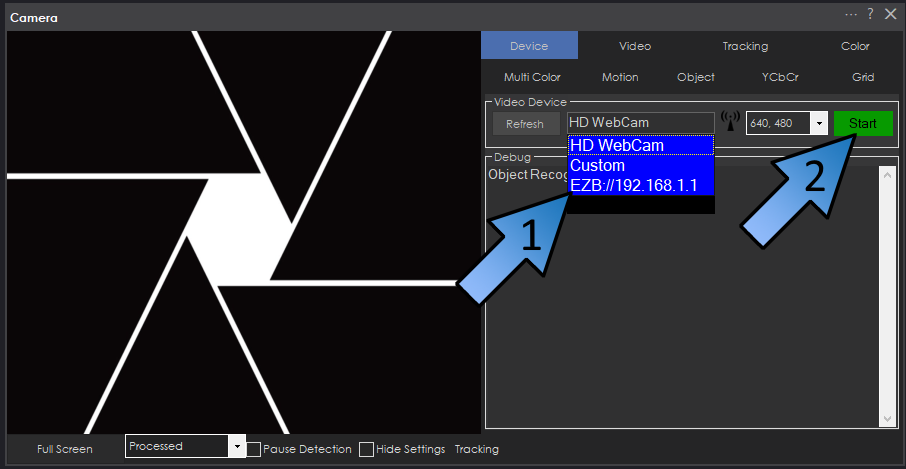
Load the JD Humanoid Example Project and connect to your robot.
Within the Camera Control panel, select the EZB camera, and click on the Start button. Step 2 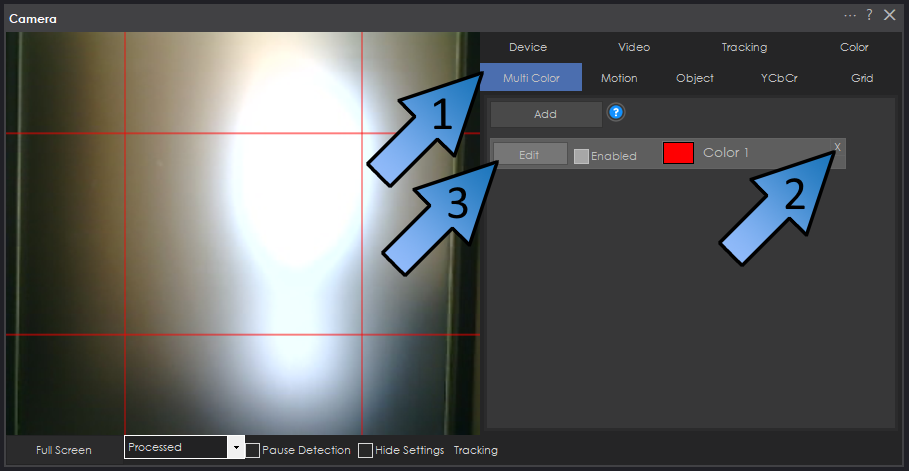
Once your robot's camera is showing streaming video, click on the "Multi Color" Tab and delete any pre-existing colors that may be listed.
Click the Add button. Step 3 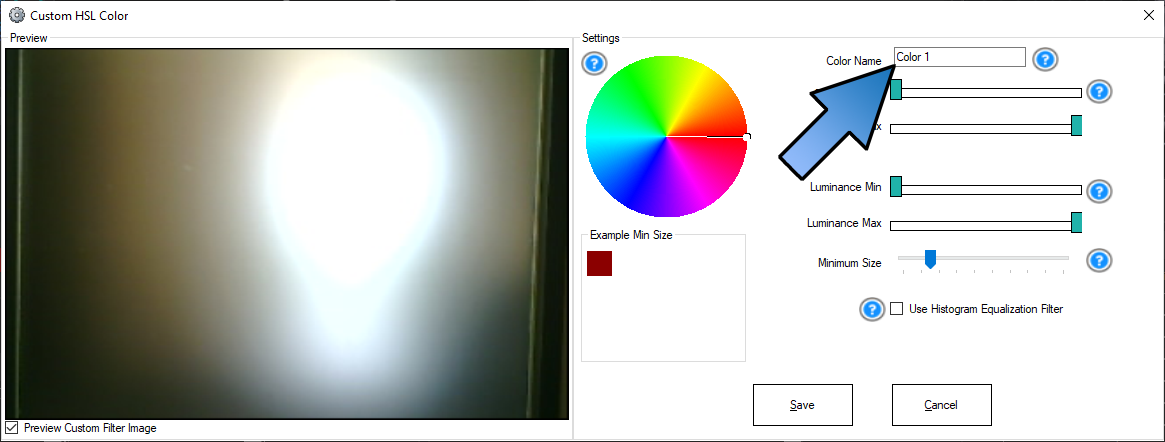
Give this color a Name.
Assigning a Name is important if you will be getting your robot to recognize multiple colors. The Name field is actually setting the variable "$CameraObjectColor", which we will use later in the tutorial, to have the robot be able to differentiate between colors. Step 4
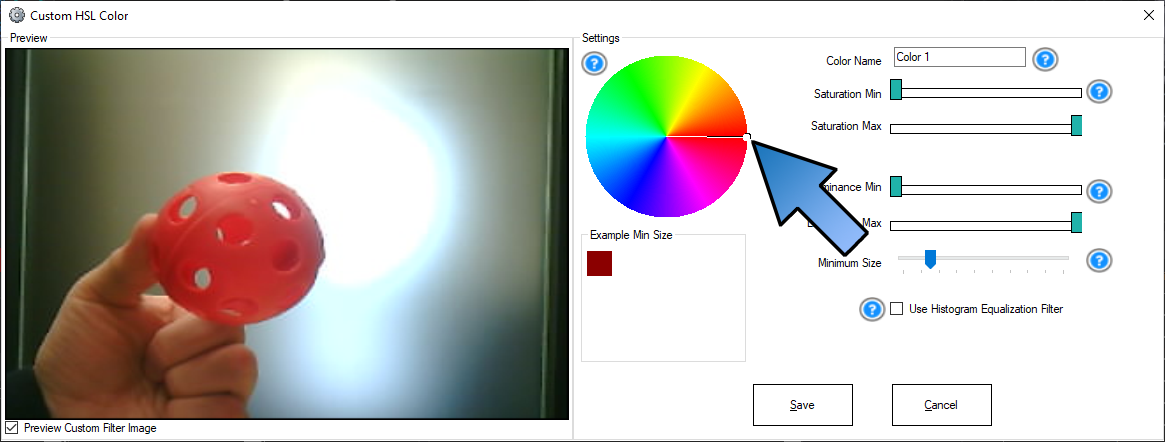
Image A) Hold your object in front of the camera and make sure there aren't any other objects in the image with a similar color.
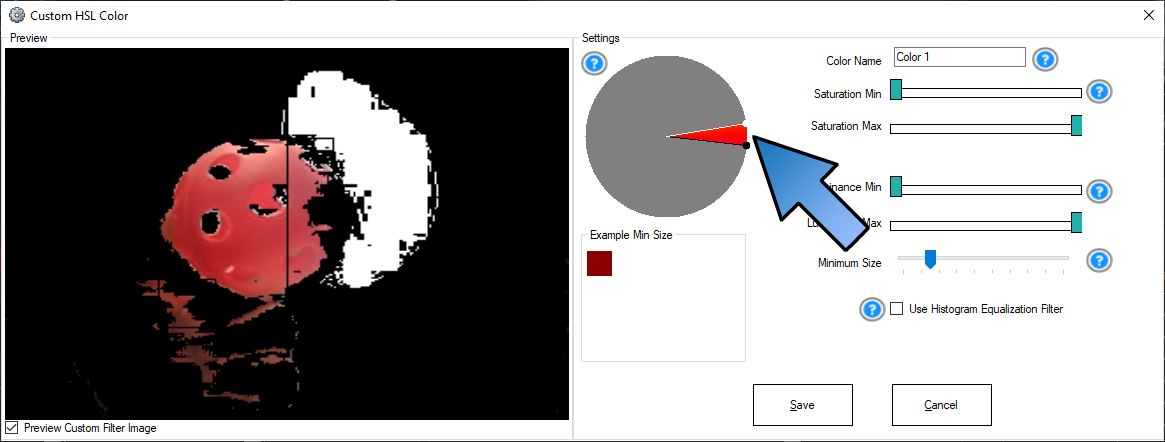
Image B) Rotate the white and black dots on the color wheel to isolate your color range. It's not important that the robot be able to see the entire colored object, but it is important that it doesn't see other fragments within the image or the robot will think those fragments are also your selected color. Image C) Use the Saturation, Luminance and Minimum Size sliders to remove other similar colors and bright areas in your image. Image D) Once you have the color well isolated, press Save. Once you have the first color set up, you can Add additional colors or simply work with a single color for the time being. Step 5 
Once you have all the colors programmed, click on the Tracking Tab in the Camera Control Panel, and select "Multi Color". This will start your robot tracking all the colors. If you have Servo Tracking or Movement Tracking selected in the Settings/Config then the robot will perform that type of Tracking.
Step 6 Getting your EZ-Robot to recognize multiple colors has value, but having the robot be able to differentiate between colors will open up a world of possibilities. This following steps will ensure that your robot is able to differentiate between different colors. Programming a range of custom responses will be handled in the If/Else and Variables tutorial. Step 7 Within the Camera Control, click on the Settings/Configuration button. In ARC this is the Three Dots in the top right corner of the window. In EZ-Builder, it's the Gear button in the bottom left corner. Within the Config Dialog window, click on the "Scripts and Variables" Tab, and then click on the "Start Tracking" Script box. *Note: Your robot will perform the script you define in this box each time the robot starts Tracking a color or object. This Script field does not define when a robot will start tracking.. Step 8 Within the Scripting Interface you can choose to program in Blockly, Python JavaScript and EZ-Script. This example will be shown in EZ-Script, so click that Tab. Type: SayEZB("I see " + Note the empty space before the closing quotation mark above. This will help your robot to leave a gap between the word "see" and the name of the color Then Click on the Variables Tab in the upper right portion of the screen. Locate and click the variable ($CameraObjectColor). The variable will be added to your script. Be sure to add a closing parenthesis to complete the command. Once completed, your script should look like this: SayEZB("I see " + $CameraObjectColor) When the robot speaks the above command, it will swap in the variable of the color the robot sees, to complete the phrase accurately. Hit the SAVE button, and give it a Try! Place the objects in front of the camera and the robot will tell you the color it sees. Now that your robot can recognize different colors, try adding Actions like a Wave or Bow to your robot when it recognizes a color... and then add IF/ELSE statements to get the robot to respond differently to different colors. |