|
TABLE OF CONTENTS
Software 1. ARC for Windows PC 2. Example Projects 3. Controls 4. Getting Help with Controls 5. ControlCommand() 6. Virtual Desktops 7. RoboScratch 8. Blockly 9. EZ-Script Mobile Software 1. Create a Mobile App Linear Programming 1. Create a Scene Using RoboScratch (Big Hero Six) 2. Create a Scene using Blockly (Avengers) Logical Programming 1. Programming Concepts (Variables, If/Else, Logic) 2. Counting Up 3. Counting Down Camera Input 1. Introduction to the EZ-B Camera 2. Face Detection with RoboScratch 3. Face Detection with Blockly 4. Face Detection with EZ-Script 5. Color Tracking with Servos 6. Color Tracking with Movement 7. Detecting Multiple Colors 8. Line Following with Roli, AdventureBot and Shell-E 9. Vision - Object Training & Recognition 10. Glyphs to Control Robot Movement 11. Detecting Glyphs & Augmented Reality 12. QR Code Detect 13. Microsoft Cognitive Emotion 14. Microsoft Cognitive Vision Audio Input 1. Speech Recognition RGB Output 1. RGB Animations Positioning 1. Servo Control 2. Introduction to Servo Motors 3. Create a Robot Dance 4. Program Robot to Dab 5. Program Robot to Play Piano 6. MYO Gesture Armband Navigation and Movement 1. Movement Panels 2. Navigating using RoboScratch 3. Navigating using Blockly Creative Applications 1. Customize Your EZ-Robot 2. Control Robot From Twitter 3. Nest Thermostat EZ-B v4 Robot Brain 1. EZ-B v4 Robot Brain Overview 2. DIY Autonomous Robot Vehicle 3. EZ-B v4 and IoTiny Wi-Fi Modes 4. Change WiFi Name 5. Resetting Your EZ-B v4 or IoTiny 6. USB WiFi or Ethernet Adapter Robot Troubleshooting 1. Which Robot are You Using? |
Movement PanelsOne of the most powerful features of ARC (formerly EZ-Builder) is the Movement Control Panel.
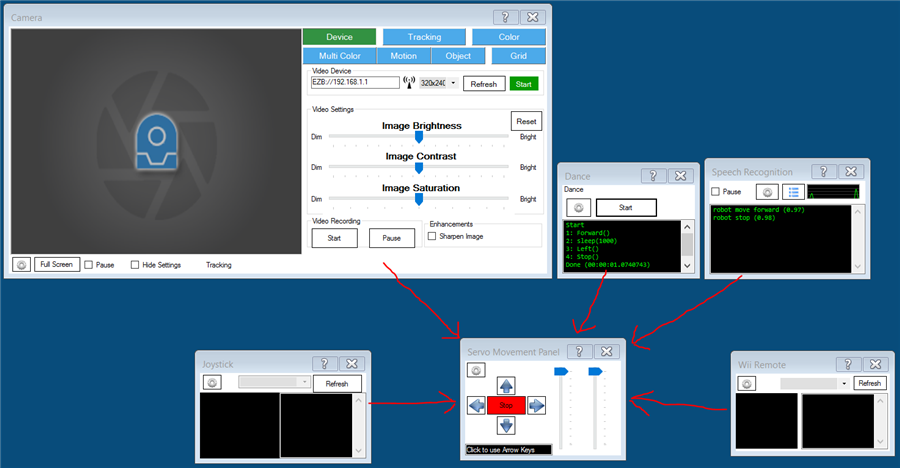
A Movement Control Panel is responsible for how your robot moves in different directions (forward, left, right, stop, reverse, etc.). ARC has different types of movement panels; there are H-Bridges, Continuous Rotation Servos and Auto Position. The type of panel you'll use will depend on the robot used and the method of locomotion. The power of the Movement Panel comes from how it integrates with the rest of the ARC software. When a Movement Control is added to your project, it registers itself as being responsible for control over directional movements, and other controls will automatically know how to access the panel and get the robot to move. *Note: Only one movement panel may be added to a project, and the movement panel must be on the first connection within the Connections Control window (number 0). See the end of this lesson for links to available Movement Panel types and popular controls utilizing Movement Panel commands within ARC. Scripting Movement
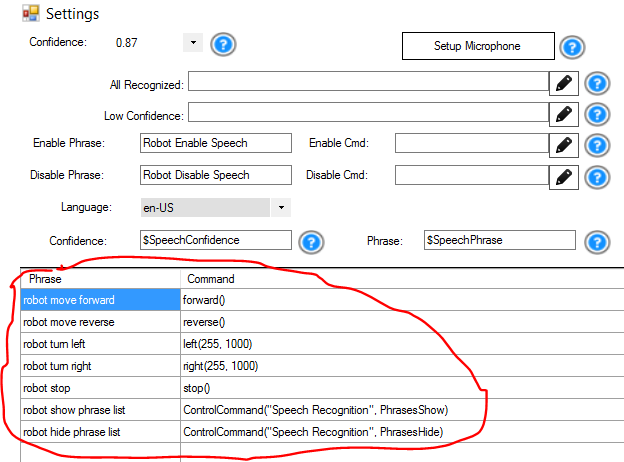
When a Movement Panel is added to your project, there are specific scripting commands which will instruct the movement panel to begin moving the robot. These are documented within the Scripting Dialog window. EZ-Robots can be programmed with RoboScratch, Blockly, Python, JavaScript and EZ-Script. For this tutorial, we will reference the EZ-Script commands. *Note: If your project does not have a Movement Control Panel, these commands will not work. EZ-Script Movement Commands Forward( [speed], [milliSeconds] ) This command will start to move your robot in the Forward direction. Optionally, you can provide the speed and/or number of milliseconds to move. Within EZ-Robot, the speed is a value between 0 and 255. Example: Forward() Example: Forward(200) Example: Forward(255, 5000) Reverse( [speed], [milliSeconds] ) This command will start to move your robot in the Reverse direction. Optionally, you can provide the speed and/or number of milliseconds to move. Within EZ-Robot, the speed is a value between 0 and 255. Example: Reverse() Example: Reverse(200) Example: Reverse(255, 5000) Stop() This command will stop your robot's movement and return it to the Stop position. Example: Stop() Left( [speed], [milliSeconds] ) This command will turn your robot to the left. Optionally, you can provide the speed and/or number of milliseconds to move. Within EZ-Robot, the speed is a value between 0 and 255. Example #1: Left() Example #2: Left(200) Example #2: Left(200, 5000) Right( [speed], [milliSeconds] ) This command will turn your robot to the right. Optionally, you can provide the speed and/or number of milliseconds to move. Within EZ-Robot, the speed is a value between 0 and 255. Example #1: Right() Example #2: Right(200) Example #2: Right(200, 5000) How About Speech Recognition? Some Control Panels, such as the Speech Recognition, can be used to trigger scripts in other Control Panels. In the example below, notice how the scripts correlate with the examples above. What About Other Controls?
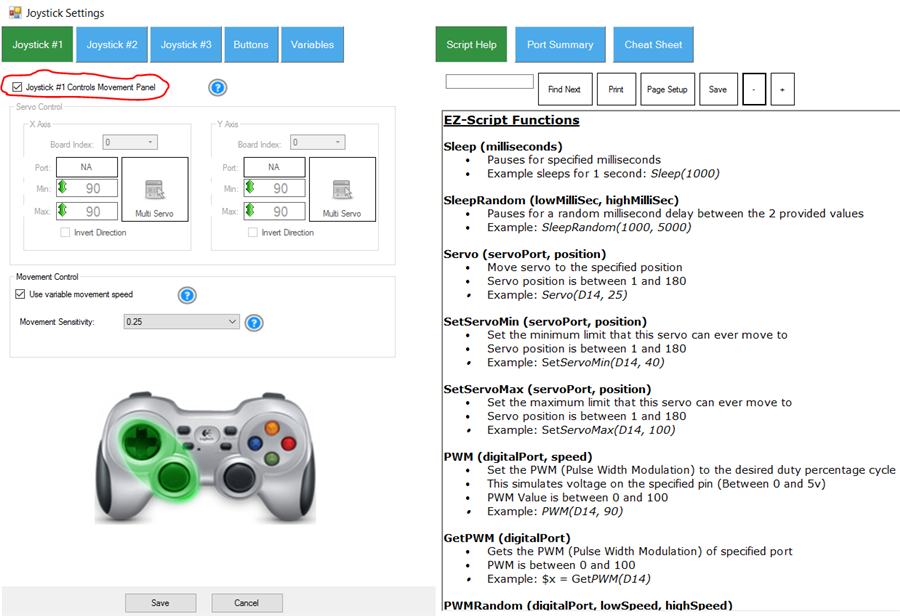
Now that we know how scripts can instruct the Movement Control Panel to perform a movement, how do other controls work with Movement Panels? As an example, if a Joystick Control was added to your project, pushing forward on the joystick will instruct the Movement Panel to begin moving forward. This is because the Joystick control is pre-configured to send the Forward command to the Movement Control Panel, which will respond by sending the technical information to the robot, to cause it to move forward. There is no need for you to program the technical information to make the robot move forward each time you want it to move. The software does the heavy lifting for you. Let's take a look at the Settings/Configuration menu for the Joystick Control. Here you will see the checkbox which assigns the Joystick #1 to "Control Movement Panel". Even The Camera Control?
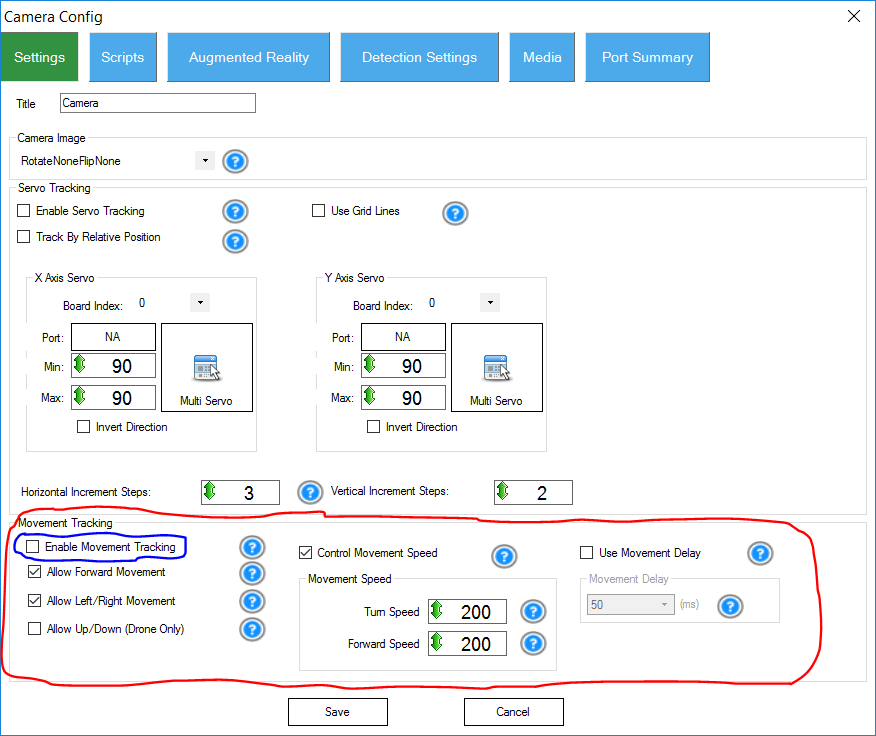
Yes! The Camera Control has an option in the Settings/Configuration Dialog to instruct the Movement Panel to move your robot when Movement Tracking is enabled. You can find out more about the Camera Control by clicking HERE. *Note: Highlighted in RED is the section that contains options to configure how the Camera Control will communicate with the Movement Panel. Highlighted in BLUE is the checkbox which enables/disables the ability for the Camera Control to track with movement. Hover your cursor over the blue question marks to get more information on each control.
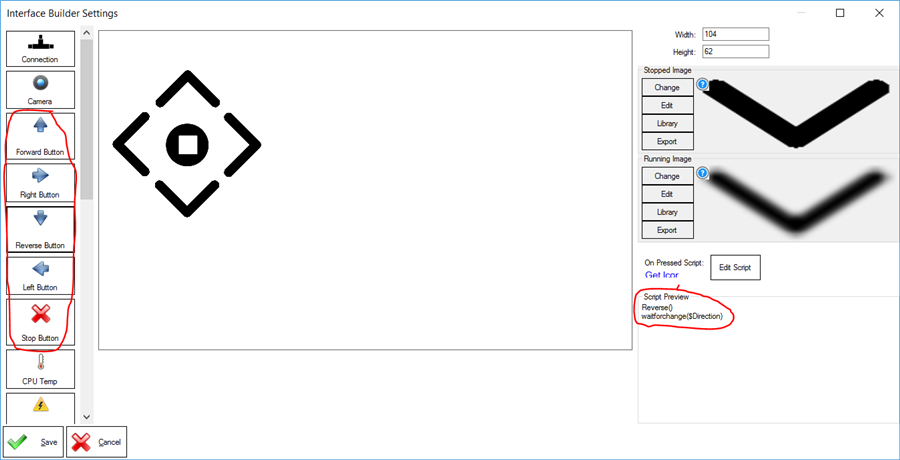
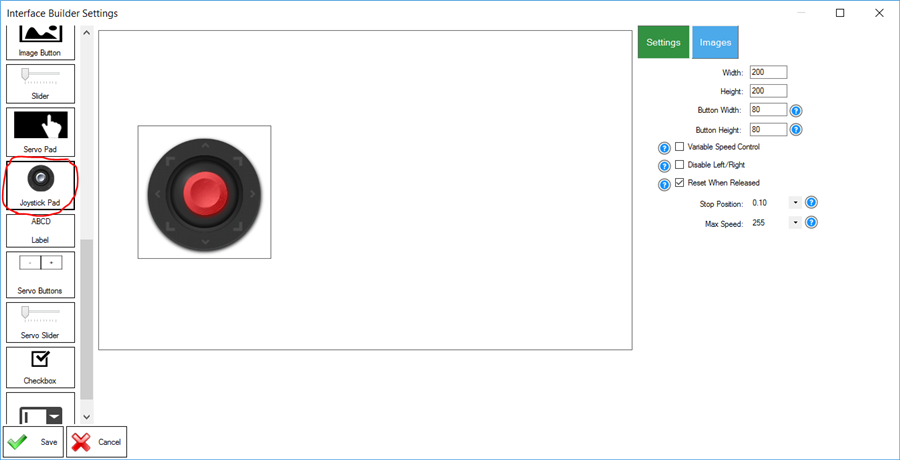
Mobile Interface Builder The trend in this lesson is that any control or script that deals with movement will instruct the Movement Panel to begin moving the robot in the specified direction. This also applies to widgets within the Mobile Interface Builder. Within the Mobile Interface Builder, you may add individual buttons to control movement direction with script commands (Forward(), Left(), Stop(), etc), or you may add the Joystick Pad for a quick way to get your robot moving. Here is an example of buttons added to the Mobile Interface Builder which will instruct movement using EZ-Script commands (Forward(), Left(), Stop(), Right(), Reverse(), etc.). Once the button is added, you can click on Edit Script in the lower right to change what the button does, if you want it to do something specific. Here is an example of using the Joystick Pad in the Mobile Interface Builder, which itself will automatically instruct the Movement Panel. One advantage to the Mobile Interface Builder's Joystick Pad is that it can control speed, if the Movement Panel supports it. Some Movement Panels (such as the Auto Position) do not support speed for servo movement.
*Note: You can tell if a Movement Panel supports speed because it will have a speed slider on it. RoboScratch
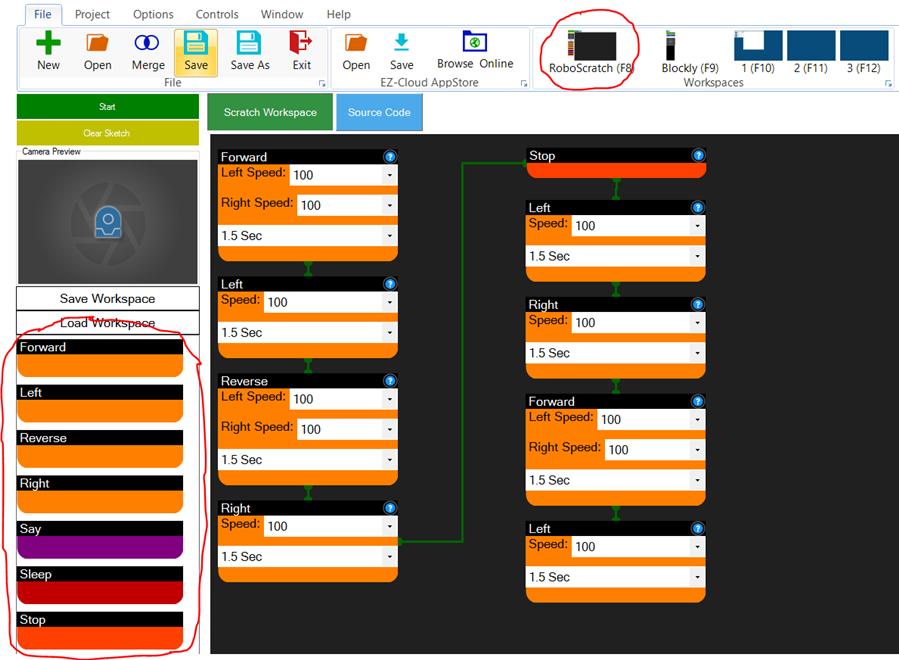
Any reference to moving (Forward, Left, Right, Stop, etc.) will automatically instruct the project's Movement Panel to begin moving. This also includes using RoboScratch, which is a great beginning linear programming interface included with ARC. Blockly
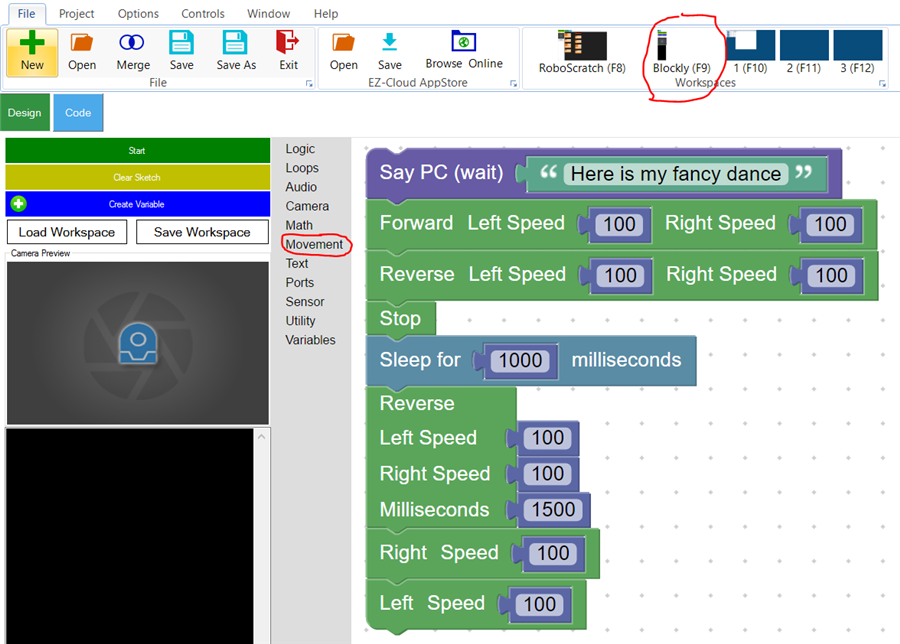
Any reference to moving (Forward, Left, Right, Stop, etc.) will automatically instruct the project's Movement Panel to begin moving. This also includes using Blockly, which is a great intermediate programming interface included with ARC. Can I Create My Own Movement Panel?
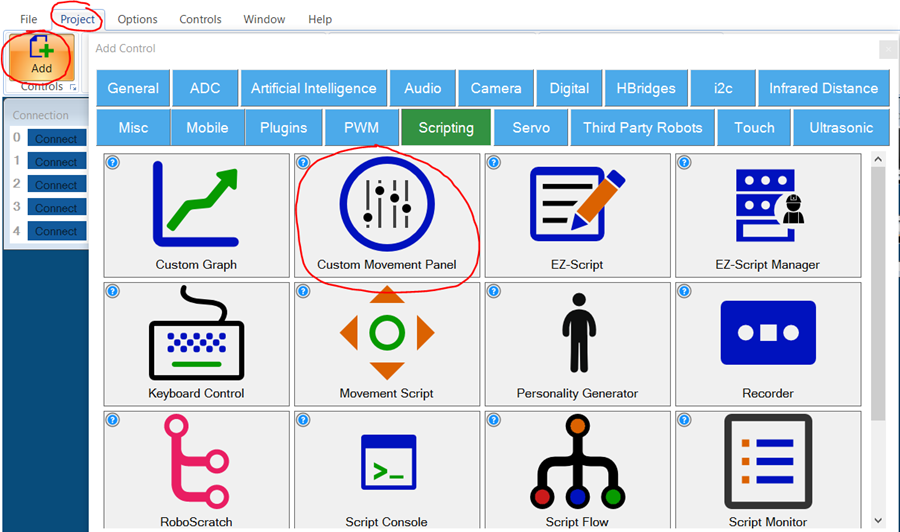
As mentioned earlier, ARC has many movement panels for H-Bridges, Continuous Rotation Servos, and Auto Position. However, if you seek to create a customized interface, the Custom Movement Panel is what you are looking for. The Custom Movement panel contains events for each direction (Forward, Left, Right, Stop, Reverse) that you may add custom code for. When another control requests to move your robot (i.e. forward, left, right, stop, reverse), the respective event in the Custom Movement Panel will be executed. Other Control Panels, such as the Joystick, Speech Recognition and Camera, will control your Custom Movement Panel. The point of this document is that any mention of a movement in ARC will instruct the Movement Panel to move the robot, even a Custom Movement Panel. Remember though, that you can only have one Movement Panel open at a time. If you want to use a Custom Movement Panel, you won't be able to simultaneously use a stock one. |

