|
TABLE OF CONTENTS
Roli Introduction and Setup
1. Getting Started with Roli 2. Using The Robot Program 3. Introduction to Robotics 4. Roli Box Contents 5. Battery Care & Charging 6. Building Roli Rover 7. Connecting Roli's Motors (H-Bridge) 8. Connecting to Roli over WiFi 9. Using a USB Wi-Fi Dongle 10. Making Roli Move 11. Care for Roli 3D Printing for Roli 1. 3D Print Files for Roli General CoursesSoftware 1. ARC for Windows PC 2. Example Projects 3. Controls 4. Getting Help with Controls 5. ControlCommand() 6. Virtual Desktops 7. RoboScratch 8. Blockly 9. EZ-Script Mobile Software 1. Create a Mobile App Linear Programming 1. Create a Scene Using RoboScratch (Big Hero Six) 2. Create a Scene using Blockly (Avengers) Logical Programming 1. Programming Concepts (Variables, If/Else, Logic) 2. Counting Up 3. Counting Down Camera Input 1. Introduction to the EZ-B Camera 2. Face Detection with RoboScratch 3. Face Detection with Blockly 4. Face Detection with EZ-Script 5. Color Tracking with Servos 6. Color Tracking with Movement 7. Detecting Multiple Colors 8. Line Following with Roli, AdventureBot and Shell-E 9. Vision - Object Training & Recognition 10. Glyphs to Control Robot Movement 11. Detecting Glyphs & Augmented Reality 12. QR Code Detect 13. Microsoft Cognitive Emotion 14. Microsoft Cognitive Vision Audio Input 1. Speech Recognition RGB Output 1. RGB Animations Positioning 1. Servo Control 2. Introduction to Servo Motors 3. Create a Robot Dance 4. Program Robot to Dab 5. Program Robot to Play Piano 6. MYO Gesture Armband Navigation and Movement 1. Movement Panels 2. Navigating using RoboScratch 3. Navigating using Blockly Creative Applications 1. Customize Your EZ-Robot 2. Control Robot From Twitter 3. Nest Thermostat EZ-B v4 Robot Brain 1. EZ-B v4 Robot Brain Overview 2. DIY Autonomous Robot Vehicle 3. EZ-B v4 and IoTiny Wi-Fi Modes 4. Change WiFi Name 5. Resetting Your EZ-B v4 or IoTiny 6. USB WiFi or Ethernet Adapter Robot Troubleshooting 1. Which Robot are You Using? |
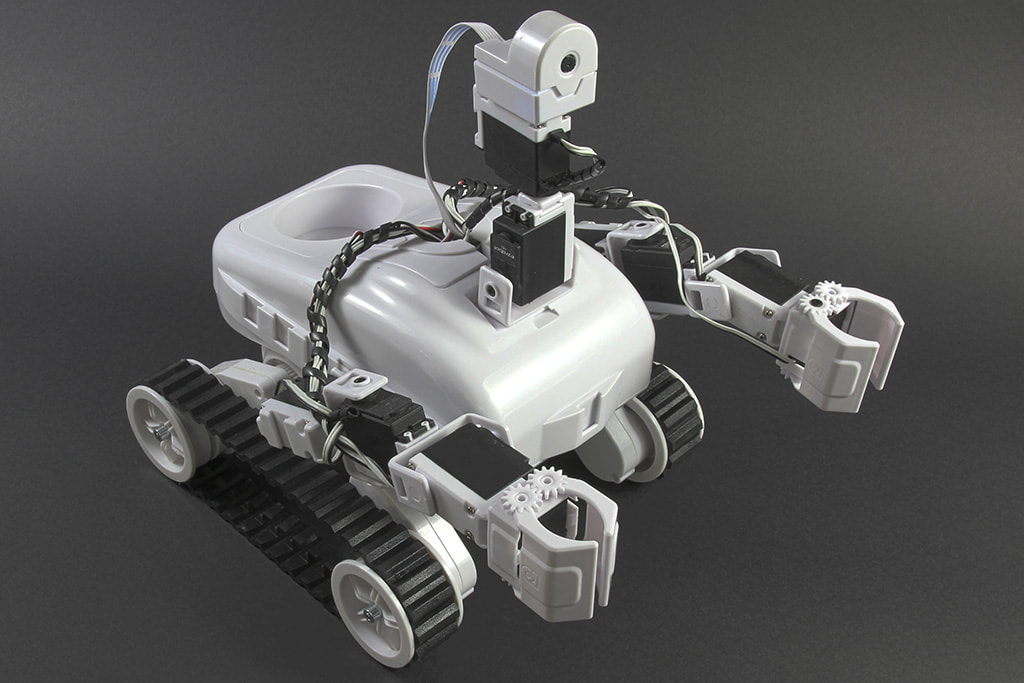
Connecting Roli's Motors (H-Bridge)Introduction
In this lesson, we will demonstrate how to connect the H-Bridge (motors) to your EZ-B v4 Smart Robot Controller. The H-Bridge is a special type of IC (integrated circuit) that converts low voltage power from the EZ-B pins to the DC motors that drive the tracks. You will find H-Bridges in any device that uses DC Motors. This is because Micro Controllers or Micro Processors (such as the EZ-B) cannot provide current to power DC motors directly. The H-Bridge is located inside the body of Roli. This lesson will connect the wiring harness from the H-Bridge to the EZ-B v4. What You Will Need
Step 1 Locate the H-Bridge wiring harness. 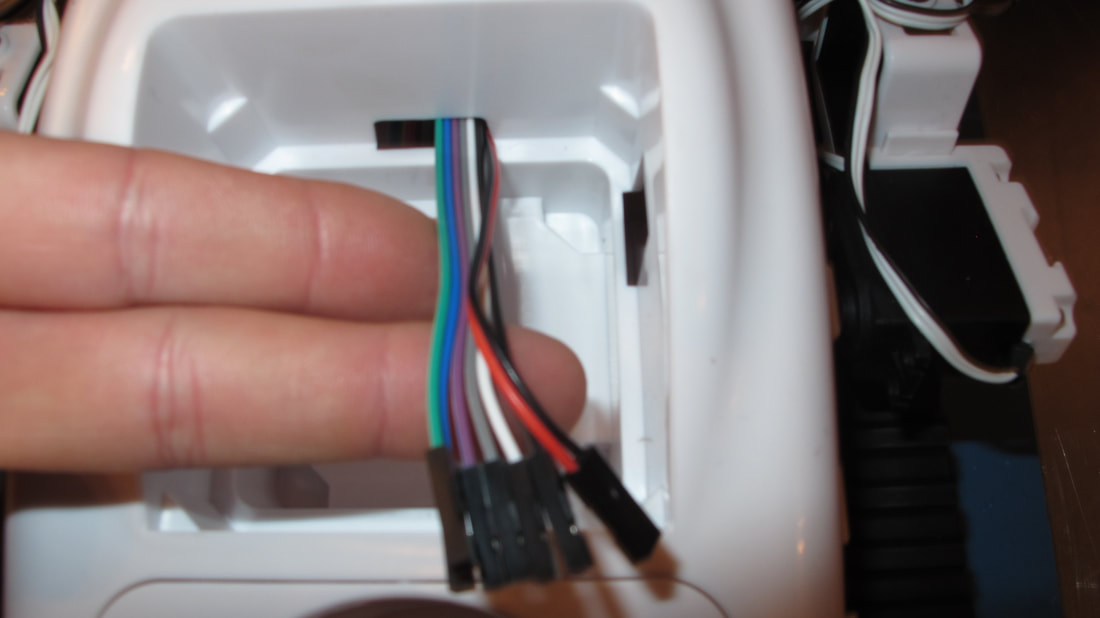
Step 2
Before we can connect the wires to the EZ-B, place your EZ-B into Roli. 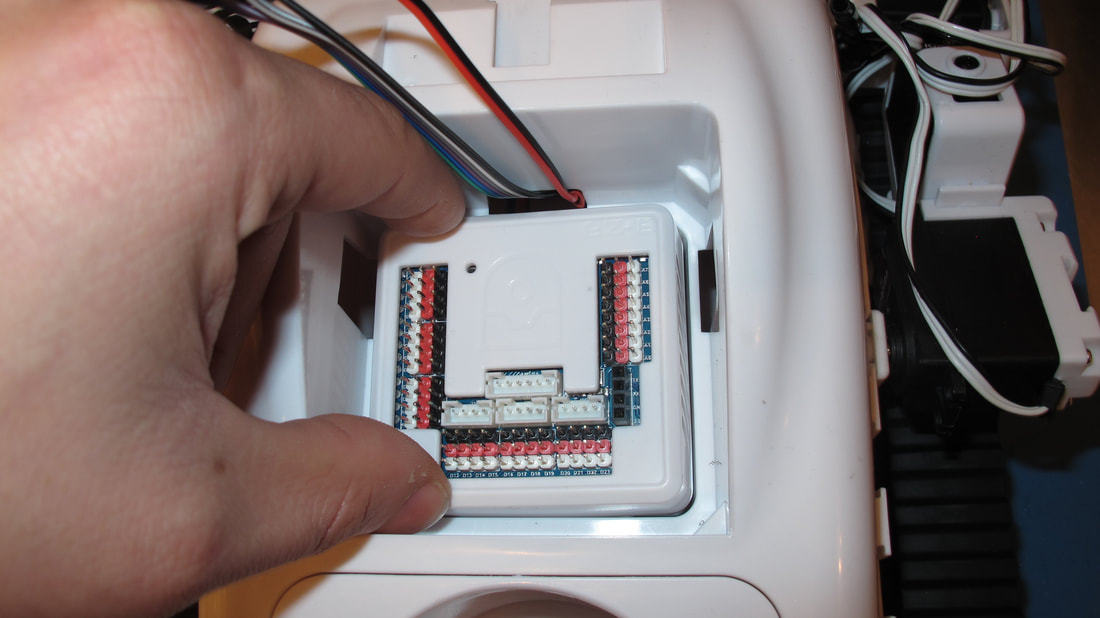
Step 3
Connect the wiring harness to your EZ-B according to the following instructions. D0 - Green (Left PWM) D1 - Blue (Left Trigger A) D2 - Purple (Left Trigger B) D3 - Grey (Right Trigger A) D4 - White (Right Trigger B) D5 - Black (Right PWM) 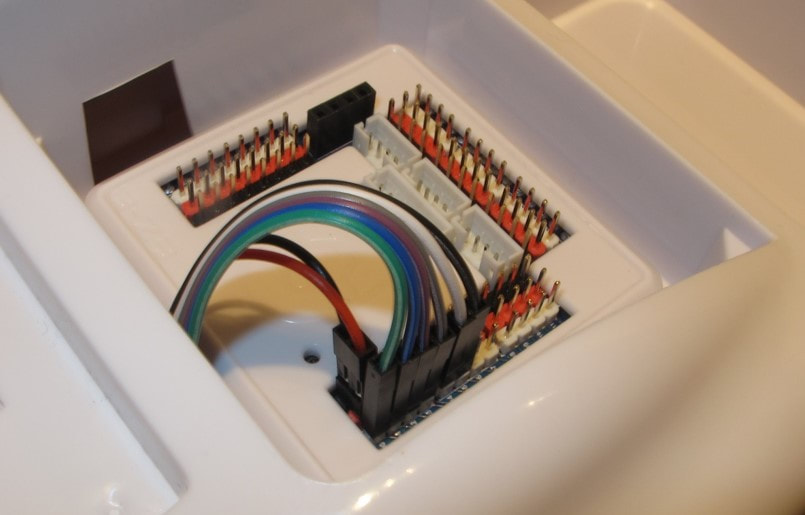
Red & Black Wires D0 Red Pin - Red Wire D0 Black Pin - Black Wire Connect the power from the EZ-B to the H-Bridge. The power wires are the two Red & Black wires from the H-Bridge. They will connect to the matching Red and Black pins of the D0 Port. Consult the photo above to see how the Red and Black wires are connected to the matching Red and Black pins of the port D0 of the EZ-B. It is very important that the Red and Black wires are not connected in reverse, or you could damage the robot. Complete You now know how to connect the H-Bridge and use its basic functions. If you experience trouble getting Roli to move, you may need to check Roli's Internal H-Bridge wiring. |